Monday, September 30, 2013

Monday Night Nerd - Saving Photos


I wanted to post this earlier since I missed last week’s post while I was traveling.
My mom is a great inspiration for me to start these posts – she always has questions regarding her computer and hopefully maybe this will help someone else too?  Or be a reference place for my mom J.
This weekend,  my mom had a question about opening and saving photos she receives in emails.  Everyone seems to send files differently.  If they are sent as an attachment this is pretty simple – click on the attachment (the file opens) and you can save it wherever you put your photos.
When they are imbedded in the email (in the body of the email vs an attachment) you can easily save the picture by
Single Right click on the photo (it brings up the menu below)
Single right click on “Save as Picture” –
This will automatically open up your documents and allow you to save the picture file somewhere on your computer.  Just name it and choose your folder. And click Save.

So all of this is good information – but what do you do with the picture next?  How do you view it?  what if you only want to keep the orange kitty and not the gray one? 
If you do not have any photo editing or viewing software, I personally think that Microsoft Power Point is the easiest to navigate to make changes to a photo, It is pretty powerful, and comes on most computers where Microsoft office is installed.
It can do some cool stuff:
First Open Power Point and let’s change the page setup to a blank page.  When you open Publisher to a new slide opens with a spot to add a title and a spot for a subtitle.  You can click on them and delete them – or you can change the page layout: (using the ribbon – or under the home tab, single left click on “Layout” and choose “Blank”

To insert your picture:
Go to the INSERT tab, click on picture and locate the folder and place where you saved your photo and open it.
You can select your photo and do make it bigger, smaller, by dragging the corners of the photo (you will see circles and squares around the pictures when it is selected.   I suggest always re-sizing from the corners so you can keep the photo in proportion.  Play with the cropping, color changing, etc… you can not do any damage to your photo because it is saved in your folders and the CTRL+Z button can un-do anything you change.  (yes – that is a great button!)  when you are all done you can save your photo in the technique taught above (right click and save-as-a photo) – only change the name and you will have both copies saved.
Hope this helps a little –
Email me if you have any problems or questions:  dw068@gmail.com


(title created using techogeek digital kit)

Wednesday, September 25, 2013


Trick or treat with Suzy Q Scraps. I love scrapping Fall & Halloween - It's the colors, I can't lie.  Something is just fun about the deep golds & reds & oranges...  Happy haunting is Suzy Q Scraps latest kit, it has so many fun elements, stick figures, word art, really too cute to be scary, and packed with loads of fun stuff.

I used another simple story grid (#9 I believe).  I turned off the doodle outline and thought it would be fun to sew into the page a bunch of word strips.  And the spider tied to the page with a button journal card is 2 elements and a quick line with the pencil tool.  simple but I thought it was cute!

You can find the kit here and it is 40% off right now too! - BONUS!


Saturday, September 21, 2013

Suzy Q Scraps M&M Autumn Bundle

Been busy scrapping, what else does one do when they are no longer cool enough to hang out with their 11-going-on-35-year-old daughter? Suzy Q Scraps  just came out with this adorable kit  memories & Moments Autumn Bundle - and right now you can pick up some free journal cards to go with it.  Find it all here:
Susy Q Scraps Store  or click on the photo below.  Underneath is what I made.  I love how simple to scrap with her pocket pages Simple Grids - I used Grid set #9 also found in here store or here.


Friday, September 20, 2013

Kerri Bradford Studio

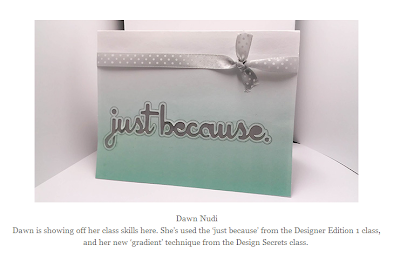
Of course I am a huge fan of Kerri and her classes, designs, etc... but today her blog post is ectra special... because my card was posted in it!  I thought I mentioned how this was made, but guess I never got to it.
Well, Kerri's blog can be found here - and yep - that's my card -
How totally exciting!  The card was a quick show off of how simple techniques can add elegance to a card.  I used Kerri's "just because" from her Designer Edition Class,  first I used the silhouette to print a gradient (also taught in a KBS class) and then cut my card.   I added an external offset to the "just because" and used the silver metallic pen tool to draw the outside offset around the letters.  I had to adjust a few points of the text to allow the machine to cut it w/o losing the inside of the letter (see the "b" and the loop in the j").  I cut that out - wrapped a simple ribbon around the top - all done!

I totally recommend Kerri's classes - she is amazing!!

Thursday, September 19, 2013

Suzy Q Scraps - Pumpkin Patch LO

I have the honor of being chosen to represent Suzy Q Scraps on her design team! - i am super excited! I love her kits - they are fun and very versatile, and the more I have been digi scrapping, the more of her kits I was purchasing and using!  I waited for a design team call and applied.  Bit my nails down to stubs for a few weeks waiting for the announcement - and wallah!

Suzy's latest kit is called Pumpkin Patch (found here) & I paired that up with her Simple Story Grids #10 (templates found here) to create the double page LO of our trip to Soergels.  Aren't those pumpkins adorable?  One thing I like to do with any kit is update things to match my pages.  Little things make a big difference.  For instance - if you look closely at the raffia tie around Sammy's photo (1st LO bottom left).  The kit comes with a yellow flower attached to the raffia.  I wanted to use the plaid pattern.  I simply duplicated the layer in PSE, used my magic wand tool to select only the flower, then inversed the selection and deleted all the other stuff, just leaving the flower.  I grabbed the plaid paper, reduced the size and clipped it to the single yellow flower, and added a brad - easy breezy!

I am on her team for a year - and I hope I can do her justice!


Monday, September 16, 2013

Monday Night Nerd - Using Excel Filters

I am a bit of a nerd at heart.  It's my dad's fault from my first VIC-20 and Commodore-64 I loved technology. And a well written spreadsheet makes my heart sing!  I use them for everything, just ask my kids.  I was a past president for a few school athletic clubs (2 at one point in time) and by having my spreadsheets organized, my job was all that much easier.  I want to share a tip using filters, hopefully if this is new to you, you might feel a little pitter-patter next time you open Excel....

I built a quick gift list for my four kids.  I included sizes of a few common items that I keep up to date, and made up a few other items to build the sheet for this purpose.  It's relatively small and on one page for example sake.  but picture this as my master holiday list, all family members included & 4 children's wish lists -oh! how many rows I need each year, the chaos can be overwhelming. Let's introduce Filters.

To enable your filter, highlight your "header" row. Click on your "Sort & Filter" button and then click on  "Filter" (highlighted below with arrows). (or use quick key shortcut CTRL+SHIFT+U) when your filters are on, you will notice the drop down arrows on your header row titles.


Below is a list of what you get when you click on those drop down arrows.  As long as you have all of your column titles being filtered, you can manipulate what you see w/o messing up the integrity of your data in your rows. (I didnt mention the text filter, I will save that for another Monday)


Now, let's say I was headed to Dick's Sporting Goods.  I filtered by the location column, and then sort A-Z on the item column. So as I head through each department I can quickly see what I want to buy, and all the other rows of data are no longer distracting me.


easy-peasy right?    Organize groups of people, filter by grade, team, birthday months, etc.... The possibilities are endless.

If you have any questions using filters, feel free to email me :) dlw068@gmail.com. Check back next week for another Monday Night Nerd post.

Sunday, September 8, 2013

New Room LO

I spent a wonderful week with Kerri Bradford (not really personally) but taking her new Design Secrets Class (found here).  I bought my Silhouette a few weeks ago and didn't open it for 2 weeks - I was terribly intimidated.  Not sure why - I have mastered my Cricut - but this new machine scared me.

There was a sale I found on another blog that led me to KBS and a discount on her classes.  I signed up for 3 classes and sat on my butt for a full weekend.  Come Sunday night, I was off and running on the Silhouette.  Kerri makes things very easy to understand, walks you through the Silhouette step-by-step, and you get some great freebies too!  This class was no different, I found it extremely helpful, and by the end of the class day 1 I created this little baby to scrap my daughter's room makeover.

I think it will be perfect too to scrap my older daughters college apt.room - why not? - I sized it 3x4 so I could add it to project life. (you can copy the jpeg and bring it into SCAL or Silhouette Studio).  I hope you can find a cool use for it too.


Here is my LO - also created in Silhouette Studio - how cool! (Kerri's class will provide the template and walk you through how this is done) then I have my entire Lo ready to cut - pics are all sized to fit my page, and I have a game plan ready to go - OH! and my journal card gets printed and cut - easy peasy.


Saturday, September 7, 2013

what have you been up to lately?

I have been busy lately with life - older 2 kids going off to college, sammy's foot surgery & dealing with her life in a boot... We are still trucking along - trying to stay busy and fit in crafting time.  The latest is Sammy's new room - not bad for a labor day project (I needed that extra day to recouperate!).

The paint colors were picked out by Sammy:

  • Pink
  • Blue
  • Purple


Then I topped off the pink with Disney Sequin paint (wal mart $29/gallon - and for the upper half of her room - 4 walls I used 1/2 gallon of it.  It is a clear overlay ... use after color paint is dry, I only applied 1 coat - and it is super cool - perfect for girly-girls of any age!)


Her dresser drawers have chalkboard paint o them (I am still looking for the handles I want to use for the pulls)


Her mirror I also painted chalboard paint around.


The saying above I cut from the silhouette - and I will try to attach the cut file as soon as I figure out how to do that :)  - and I don't have a pic of the tinkerbell sitting on her light switch - also silhouette cut-out - I pulled the image from this pinterest post into silhouette and traced and cut it at 3" high - it looks super cute!

Post link: http://pinterest.com/pin/76701999876662993/


The room inspired me to create a   cute cut out file, for her scrapbook page about t - again - once I get this blogging thing down - i will be more than happy to share the files!